


Beauty

Share
Published 15:43 7 May 2018 BST
Updated 16:35 7 May 2018 BST

 1. Use Your Hand: First deposit some of your eyeliner on the back of your left hand. This will become your canvas. The heat of your skin will soften gel eyeliner and make it a little bit more manageable.
2. Steady Yourself: When applying eyeliner it’s always helpful to rest your elbow on a hard surface, this will help to steady your hand.
Choose your location wisely. We recommend sitting down at the kitchen table with a medium-sized mirror. Make sure that you can see exactly what you’re doing. If the light isn’t great, simply get a lamp and angle it so the light falls onto your face.
3. Dot It: Using your brush, make three dots across the top of your eyelid where you want your line to go. They don’t have to be perfect or anything, don’t worry. These dots will simply act as your guide and help you to get the right line.
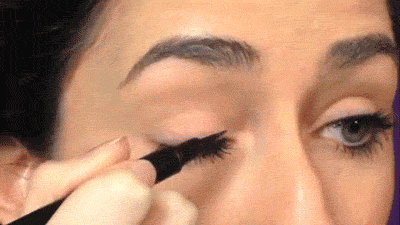
4. Exhale: Now it’s time to join the dots. As you draw the line between each dot, exhale. This will help to keep your hand steady. Honestly, it works! Try to get your line as even as possible. If it looks a bit crooked, simply go back over the problem area. Remember, your line should resemble an arch slightly.
When you’re happy with your line, fill in the white space beneath it. Make sure that there are no white gaps from your eyelashes up to the line you’ve just drawn.
5. Pick Your Flick: Next, pick up a normal kohl pencil liner. Once your gel eyeliner is dry, pick the point on your eye where you want your eyeliner flick to end. When you’ve chosen that point, use your pencil liner to draw (from that point) back down to your original gel line. Shape the line as best you can – if you open your eye to check your progress from time to time, this will help you stay on track.
As soon as you’re happy with your pencil flick, go over it with your gel eyeliner. Your eyes should have that feline look about them now.
6. Eye Shadow = Staying Power: As soon as everything is dry, take a cotton bud and cover it with some jet-black eye shadow. Carefully go over your eyeliner with the eye shadow. This will help to set the line and make it budge-proof.
Congratulations! You’ve now officially graduated from eyeliner class 101. Remember, this takes practice and patience, so even if your line is a bit wonky at the start, things will even out eventually. Promise!
1. Use Your Hand: First deposit some of your eyeliner on the back of your left hand. This will become your canvas. The heat of your skin will soften gel eyeliner and make it a little bit more manageable.
2. Steady Yourself: When applying eyeliner it’s always helpful to rest your elbow on a hard surface, this will help to steady your hand.
Choose your location wisely. We recommend sitting down at the kitchen table with a medium-sized mirror. Make sure that you can see exactly what you’re doing. If the light isn’t great, simply get a lamp and angle it so the light falls onto your face.
3. Dot It: Using your brush, make three dots across the top of your eyelid where you want your line to go. They don’t have to be perfect or anything, don’t worry. These dots will simply act as your guide and help you to get the right line.
4. Exhale: Now it’s time to join the dots. As you draw the line between each dot, exhale. This will help to keep your hand steady. Honestly, it works! Try to get your line as even as possible. If it looks a bit crooked, simply go back over the problem area. Remember, your line should resemble an arch slightly.
When you’re happy with your line, fill in the white space beneath it. Make sure that there are no white gaps from your eyelashes up to the line you’ve just drawn.
5. Pick Your Flick: Next, pick up a normal kohl pencil liner. Once your gel eyeliner is dry, pick the point on your eye where you want your eyeliner flick to end. When you’ve chosen that point, use your pencil liner to draw (from that point) back down to your original gel line. Shape the line as best you can – if you open your eye to check your progress from time to time, this will help you stay on track.
As soon as you’re happy with your pencil flick, go over it with your gel eyeliner. Your eyes should have that feline look about them now.
6. Eye Shadow = Staying Power: As soon as everything is dry, take a cotton bud and cover it with some jet-black eye shadow. Carefully go over your eyeliner with the eye shadow. This will help to set the line and make it budge-proof.
Congratulations! You’ve now officially graduated from eyeliner class 101. Remember, this takes practice and patience, so even if your line is a bit wonky at the start, things will even out eventually. Promise!
Beauty

Beauty

Beauty

Beauty

Beauty

Beauty


